Hypnotic Visual Maker

The Hypnotic Visual Maker lets you create your own customized visuals for the induction screen, with an enormous amount of flexibility.

First, notice the Color Tunnel, Spiral, Custom Objects, and Grock Tunnel tabs on the top left of the screen. Click on the one that you want to create.
General Options
Timer Speed (higher is slower)
This slider changes the speed of the custom visual.
Reset Visual
This button resets the current visual to the default values.
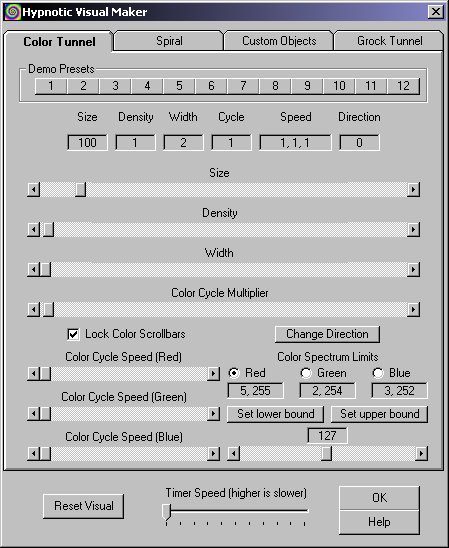
Color Tunnel
The ColorTunnel is also available as a separate program.
At the top of the window, you'll notice a list of Demo Presets. Click on one to see the incredible effect.
Size
This slider changes the overall size of the tunnel
Density
This slider changes the distance between the tunnel's lines, making the colors
denser or sparser
Width
This slider changes the size of the tunnel's lines, which is the same as the
Thicker and Thinner buttons for the spiral.
Color Cycle Multiplier
This increases or decreases the amount of colors drawn
Lock Color Scrollbars
This locks the Color Cycle Speed scrollbars right below it, so that
they stay synchronized
Change Direction
This changes the direction of the tunnel; by default the colors go inward,
and by clicking this you can make them go outward.
Color Cycle Speed (Red/Green/Blue)
These sliders change the color cycling speed of each color
Color Spectrum Limits
This section changes the color limits of each color cycler. First
choose either Red, Green or Blue. Then select a color value with the slider
below it. Once you have the color selected, choose either Set Lower Bound
or Set Upper bound to set either the lower or upper color limit.
At the top of the window, the values of these options are shown.
Here is a sample of the color tunnel in action:

Spiral

Zoom
This slider lets you change the size of the spiral, and lets you zoom in and
out to find a size and look that you like.
Width
This slider changes the width of the spiral
Height
This slider changes the height of the spiral
Limit
Changes the maximum number of points plotted during each cycle, which will
change the size of the spiral.
Change
This slider changes the spiral's update interval, according to the speed on
the Position Scale (below). Lowering the value will allow
a slower, smoother movement, and raising it will allow a more rapid movement.
Thicker and Thinner
These buttons make the spiral lines thicker and thinner
Choose Color
Click this button to change the spiral's color, which will only work if Auto
Cycle Colors is unchecked. This will pop up a color selector dialog.
Auto Cycle Colors
If this is checked, the spiral will automatically change colors. If it in
unchecked, the color chosen by clicking the Choose Color
button will be used.
Position Scale
This slider shows the spiral's current position on it's position/animation
scale.
Set Low and Set High
By default the spiral goes through the entire position scale.
To make it only use a certain area of the scale, select the starting position
with the slider and click Set Low. Then, select the ending
position and click Set High. The set positions are displayed
below each.
Increment Position
Moves forward on the position scale 1 point.
Decrement Position
Moves backward on the position scale 1 point.
Change Direction
Changes the direction that the animation moves along the scale.
Automatic
Select this for the spiral to move through the entire position scale
automatically.
User-defined
Select this for the spiral to only move through the position scale
area set by the Set Low and Set High buttons.
Stop Spiral
Select this to stop the movement of the spiral
Loop
When this is checked, the spiral will move through the position scale
(either the whole or the user-defined area), and when it reaches the end,
it will jump to the beginning and continue (loop). When this is unchecked,
and it reaches the end, it will start moving backwards along the position
scale until it reaches the start, and then will continue forward.
Inverse
Check this to invert the spiral.
Inverse Loop
When this is checked, the value of the Inverse check box
will be changed whenever the spiral reaches either end of the position
scale.
Here's a picture of a custom spiral in action:

Custom Objects
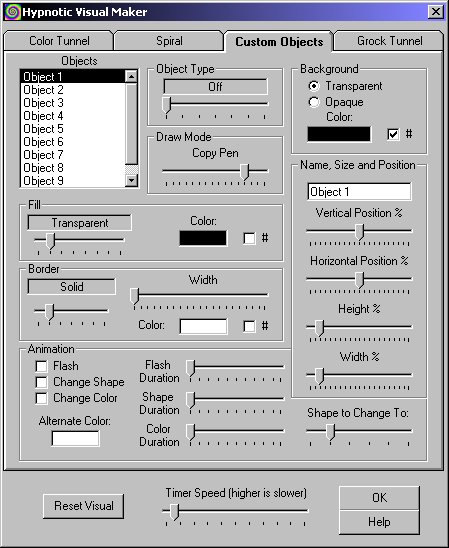
The Custom Objects system allows the user to create their own shape-based animations instead of just using the Color Tunnel or Spiral sections.
Objects
This lists the available objects. There are 10 maximum. Click on one to select
it, and it's settings will be shown in all the other areas.
Object Type
This selects the shape of the object.
Background
This selects the type of background the object should have. The # checkbox
selects this for color changes (see the Animation section below)
Draw Mode
This selects the object's draw mode. This is only for advanced users only.
Name, Size and Position
This section lets you set the object's name, vertical and horizontal positions,
and height and width.
Fill
This selects the fill color for the object, and the type of fill. The # checkbox
selects this for color changes (see the Animation section below)
Border
This selects the border color of the object, the border type, and the border
width. The # checkbox selects this for color changes (see the Animation section
below)
Animation
This section determines how the object should animate.
Flash
Makes the object flash on and off. The Flash Duration slider sets the flashing
speed.
Change Shape
This makes the shape change to another shape. The Shape Duration slider sets
the shape changing speed.
Change Color
This makes the shape change colors. The color to change is selected by one
of the # checkboxes in the above sections. The Color Duration slider sets
the color changing speed.
Alternate Color
This is the alternate color to use.
Shape to Change To
This sets the shape type to change to. The values for this are the same as
the Object Type section above.
Here is an example of the Custom Objects system being used to recreate the "Hypnotic Eye" effect from the movie The Hypnotic Eye:

Grock Tunnel

Grock Tunnel is a remake of the Grock hypnosis software program. It creates
an animated tunnel-based induction system with phrases and tones.
The word list files are simply text files with lists of words, and two script
variables can be used in them: %name% and %trigger%. These files are stored
in the "wordlists" folder.
Shape Style
In the Shape Style section, select the type of shape you want to use.
Animation Color
Two colors are shown; click on one of them to change them. On the right side, you'll see:
Single Color (#1)
This option makes Grock Tunnel only use the first color shown in
this section.
Alternating Colors
Select this to alternate between the first and second colors.
Random
This option will randomly generate colors for the tunnel.
Enable Fade
This lets you enable or disable the fade effect, and is only available
for Alternating Colors and Random.
General Parameters
Shape Width
This changes the thickness of each shape drawn
Shape Offset
Changes the number of shapes drawn, without stretching them out to
fit in the window
Horizontal Size Change
This determines the amount of space horizontally between each shape
Vertical Size Change
This changes the amount of space vertically between each shape
Text and Tone Parameters
Change Font
This allows you to change the font of the displayed text
Set Text Color
This changes the color of the text
Set Back Color
This sets the color of the background
Enable Text
This turns on and off the visible text.
If the text is off, the screen will not automatically clear after every word;
try also unchecking Enable Fade for a good example.
Note that even if this is unchecked, the program will still read the text
from the file, and stop when it reaches the end. To prevent it from stopping,
check the Loop Text box.
Enable Tones
This turns on and off the audible tones
Use Soundcard
If checked, the sound card will be used for the tones. Otherwise the PC speaker
will be used.
Frequency (start)
This is the frequency (in hertz) for the tones to start at, at the beginning
of the session (or script)
Frequency (finish)
This is the frequency (in hertz) for the tones to finish at, at the
end of the session (or script)
Loop Text
If this is checked, the text file will loop. If it's unchecked, the
session will end when the wordlist file ends.
Volume
This changes the volume of the tones
Duration (ms)
This changes the length or duration of each tone in milliseconds
Sine, Square, Triangle, PointSine
These change the type of tone wave. See the Brainwave
Synchronizer section for more information.
Number of Shapes
This sets the number of shapes drawn on the screen, and stretches them to fit in the window

Circles being used, and stretched horizontally:
